VideoBrain Family Computer
The PS Pad Editor and DASM Assembler
Assembling Fairchild F8 CPU Source Code
May 9, 2012, Last Update May 21, 2012
This article explains how to set up the PS Pad text editor so that it will automatically assemble a Fairchild F8 CPU source code program using the DASM macro assembler, which is a command line only program. The user will be guided through the process required to make DASM the default editor using step-by-step directions and screenshots (which can all be clicked on to see the full version). Once the steps are completed, PS Pad becomes more than just a text editor; it becomes a nearly complete Integrated Development Environment (IDE).
Note that PSPad 4.5.6 was used when this document was written. Set up for other versions may be slightly different.
Table of Contents
- Introduction
- Download and Install the DASM Assembler
- Download PS Pad and F8.ini
- Set up PS Pad for use with DASM Assembler
- Test PS Pad by Assembling F8 Source Code
- Summary
- Version History
I. Introduction
I program for several different classic microprocessors that use different assemblers. Every assembler that I use is for use with the command line. While this isn't a hurdle, I do prefer a GUI interface. Using PS Pad, a freely distributable text editor for Windows, I am able to use it as a front end for all of my assembly work on various processors.
In most cases, programmers use the file extension .asm for an assembly source code file. In my case, this won't work because I use different assemblers for different CPUs. PS Pad determines which assembler to use for various source code based on the file's extension. Thus, in my case, .asm files will be assembled as 6800 CPU source code, and a .z80 file is assembled as Z80 source code. I decided to make .F8 the designated source code extension for PS Pad to assemble Fairchild F8 CPU files. Commonly the F8 file extension is used for font files, and less commonly for Flash 8 files. This doesn't matter to PS Pad. As long as you follow these instructions, then your source code with the file extension F8 will be assembled correctly.
II. Download and Install the DASM Assembler
used from the command line
DASM is a command line assembler that supports several microprocessors, including the Fairchild F8 CPU. DASM works perfectly well without a front end, but when used in conjuction with a frontend, such as PS Pad, the pairing of the two makes for a near-complete IDE. For a more complete summary of DASM read this.
These steps prepare DASM for use with PS Pad:
-
Download and install the DASM assembler. The latest version can be found on the DASM website. If the website isn't working at the moment, the version used to create this tutorial is available as a local file.
http://www.dasm-dillon.sourceforge.net (DASM's Main Website)
www.sourceforge.net/projects/dasm-dillon/ (DASM Program Link)
dasm-2.20.11-win32-x86.zip (DASM 2.20.11, Local Version)
- For use with these instructions I have placed dasm.exe (located in the "bin" directory of the DASM archive) into a newly created directory called C:\dasm. This isn't strictly necessary, as DASM will work from any location, but it may make following the set up of PS Pad a bit easier to follow.
At this point, DASM can be used as a command line assembler. No additional files other than dasm.exe are needed and no set up of DASM is required.
III. Download PS Pad and F8.ini
Here are the steps required to set up PSPad and DASM for use with the F8 CPU.
-
Download PS Pad from the PS Pad website. The latest version can be found there. Or, if the website isn't working at the moment, the version used to create this tutorial is available as a local file.
www.pspad.com (PS Pad Website, get latest version here.)
pspad456en.zip (PS Pad 4.5.6, Local Version)
- PS Pad does not have to be installed. All of the files required to run the program are contained in the archive. Once the archive is unzipped, then the program will run simply by executing PSPad.exe.
- The f8.ini set up file will allow PS Pad to "understand" that an F8 extension is for use with an F8 assembler (once we finish with the set up).
- Download the f8.ini set up file:
[...]/videobrain/f8_programming/programs/pspad/f8.ini
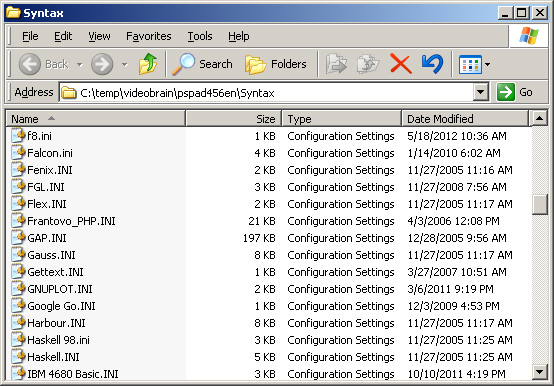
- Place the f8.ini file into the Syntax directory of the PS Pad directory.
The PS Pad editor can now be started, but it will not yet be able to assemble F8 source code. For that, the editor must be set up for use with an assembler.
I created this basic f8.ini myself. If you desire, you can change it and extend it to suit your various needs. For example, the f8.ini file can be configured so that PS Pad recognizes F8 keywords and reserved words, among many other powerful options.
IV. Set up PS Pad for use with DASM Assembler
This is how to set up PS Pad to automatically assemble F8 source code:
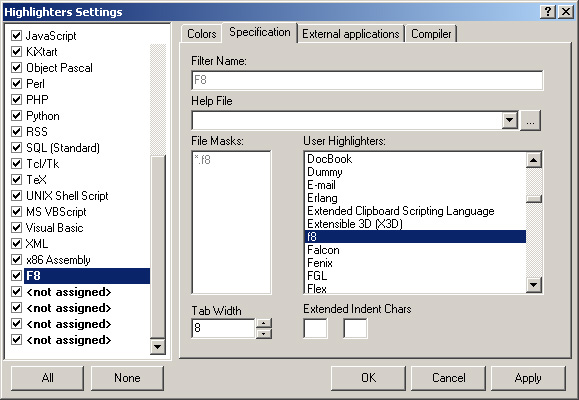
- Click Settings > Highlighter Settings. Choose the tab called "Specification."
- Scroll down the list on the left-hand side and highlight "<not assigned>". Choose "f8" from under "User Highlighters:" Click the "Apply" box.
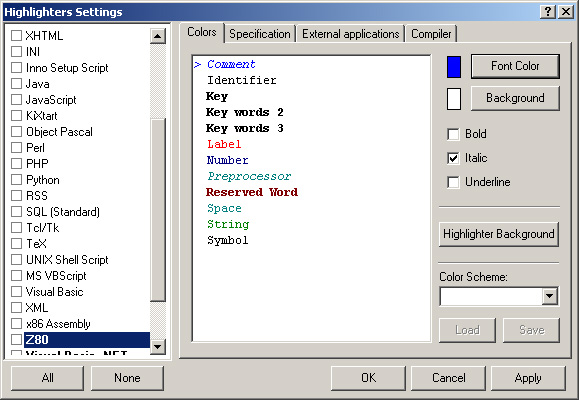
- The default color for comments is blue. This is non-traditional, and I prefer the more standard green.
 PS Pad's "Colors" Tab
 - Click the "Colors" Tab.
- Choose one of the shades of green that looks good to you. I prefer the basic green that is fourth from the top and third from the left. Its color values are: Red: 0, Green: 128 and Blue: 0. Click "Apply."
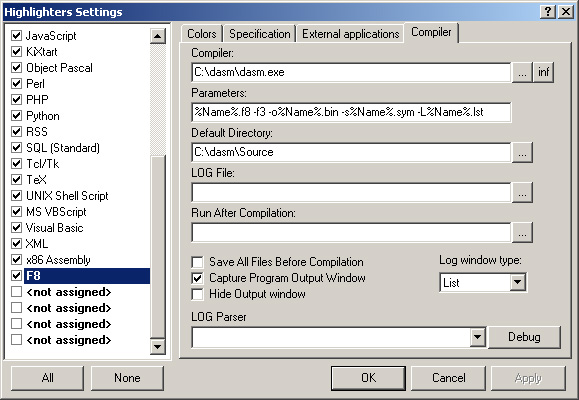
- Click the "Compiler" Tab.
- Make sure the box next to "Capture Program Output Window" is checked.
PS Pad's "Compiler" Tab - Several fields that deal with how to execute the compiler (or, in this case, the DASM assembler) need to be filled in. If any one of the fields is not correct, then the assembly of your program may not work as expected, or possibly not work at all. You must fill the fields with the directories required on your own computer. Do not copy and paste what I use in my field examples, unless you have decided to use the path C:\dasm as I have done.
- Compiler - This is the path to the location of the DASM assembler. Place the path to DASM here.
C:\dasm\dasm.exe
- Parameters - These are the options that would normally follow DASM when typed on the command line. These options must by typed exactly as shown, or else DASM will not assemble the file correctly. The options for DASM are:
%Name%.f8 -f3 -o%Name%.bin -s%Name%.sym -L%Name%.lst
- Default Directory - This is the location of your F8 source code. Type the path to your programming directory (where your F8 assembly source file is located). For this simple example I chose to create a directory called "Source" in the dasm directory.
C:\dasm\Source
- LOG File - I don't use a log file, so I don't fill in this field.
- Run After Compilation - I don't use this field, but it is so that the assembled final binary file can be run in an external program (say, with the MESS emulator).
- Compiler - This is the path to the location of the DASM assembler. Place the path to DASM here.
- Set up of the fields is complete. Click "OK"
- Quit PS Pad and then restart it.
V. Test PS Pad by Assembling F8 Source Code
Now that you have finished setting up PS Pad to automatically assemble an F8 source file, it is time to test it. These steps will guide you through making sure that an F8 source file will assemble correctly.
-
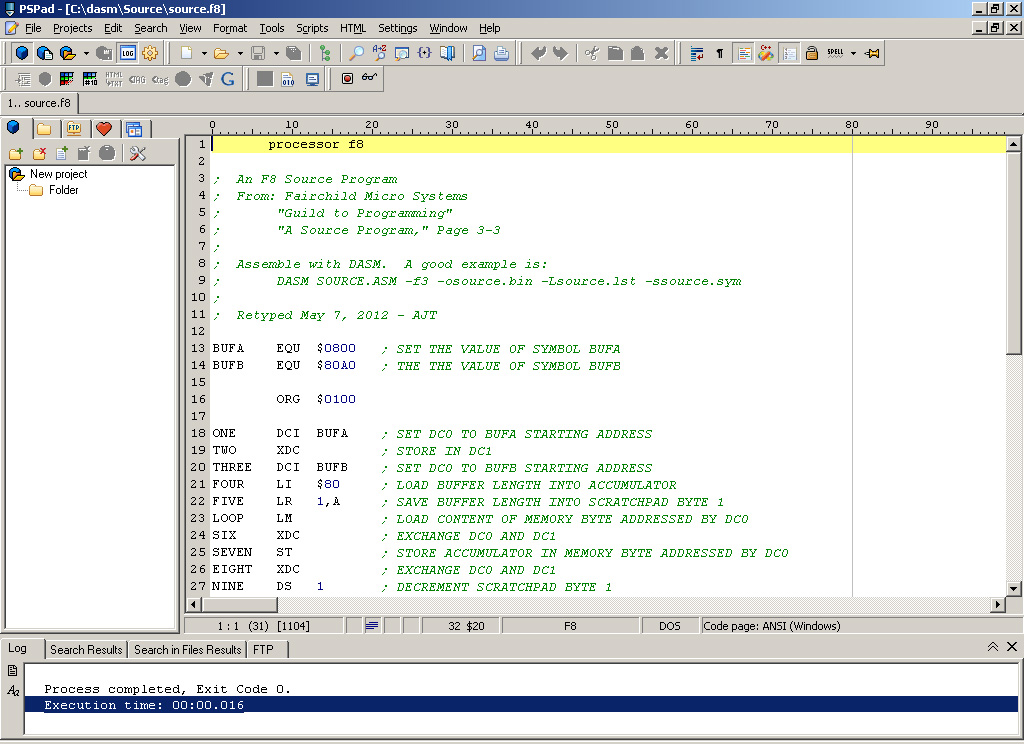
Download example F8 source code. The source code must be saved in the previously setup "Default Directory" (under the "Compiler" Tab), which I set up as "C:\dasm\Source." "Source.f8" is example source code from the Fairchild Micro Systems' Guide to Programming. The source code can be downloaded here:
[...]/videobrain/f8_programming/programs/pspad/source.f8
- Load "source.f8" into PS Pad using File > Open
- Assemble the F8 source file. There are three ways to assemble a source file, and all three will accomplish the same thing:
- Choose File > Compile
- Click the "Run external compiler to compile file" icon from the control toolbar. The icon has 1's and 0's on it.
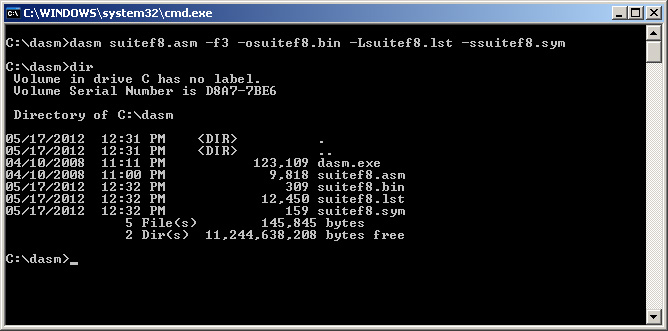
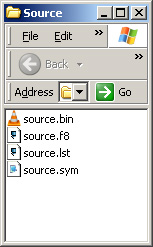 PS Pad Created Three Files
 - Run external compiler to compile file (CTRL + F9)
- If all went well then the "log" output should read something like this:
Process completed, Exit Code 0.
Execution time: 00:00.031
- After execution three files will be created in the "Default Directory:" source.bin, source.lst and source.sym.
- Without closing source.f8, open the file source.lst. Now you have two tabs available to you, the source file and the assembly listing. Whenever you reassemble the source file, a message box will appear that says "File Contents were Changed. Reload? Source.list." Click yes.
VI. Summary
PS Pad is a fantastic editor. Now that you have it set up to assemble your F8 programs with DASM, you will see that these combined programs are a true time saver. PS Pad allows quick switching back and forth between source code and listing files as well as plenty of customization for all your needs. Once you begin to use it, before long, you will wonder how you ever got along without it.
-- A.T.
VII. Version History
1.03 - May 21, 2012
- Corrected spelling errors pointed out by Chris Federico.
- Made changes suggested by Kurt Woloch.
1.02 - May 18, 2012
- Updated article for version 4.5.6 of PSPad
- Greatly increased content of text.
- Added screenshots.
- Updated to HTML version
1.01 - May 9, 2012
- Fixed misspelling of "Guild" to "Guide" in Step #9.
1.0 - May 8, 2012
- First Release of article as posting on Channel F and VideoBrain Yahoo
Discussion Group.